
ifconfig
ifconfig #shows an active interfaces
ifconfig -a #shows all interfaces
ifconfig eth0 # shows only info about the eth0 interface
ifconfig eth0 10.0.1.1.120/24
ifconfig eth0 netmask 255.255.255.0
route add default gw 10.0.1.1
ifdown eth0
ifup eth0
ip
ip address #shows all interfaces, long command
ip a # shows all interfaces, short command
ip address add 10.0.1.1/24 dev eth0 # add ip address to the specified interface
ip address delete 10.0.1.1/24 dev eth0 # delete ip address from the specefied inteface
ip link set up eth0 #turn on the specified interface
ip link set down eth0 # turn off the specified interface
ip route add 10.0.1.0/24 dev eth0
ip route #shows existed routes
ip route add default via 10.0.1.1 # add gateway / default route
echo “nameserver >> 10.1.1.1” >> /etc/resolv.conf # add name server address to the system / specify the DNS
dhclient -v ens192 # show DHCP info
dhcpcd -k # release dynamic IP
dhcpcd # update IP via dhcp
systemctl status dhcpcd # show current status dhcp service
WiFi (wireless-tools)
iwlist scan
iwconfig # WiFi networking setup tool
sudo wpa_passphrase <MyWiFiNetwork> > mynetwork.conf # Enter passphrase for access to the selected network
sudo wpa_supplicant -i wlan0 -c mynetwork.conf -B #-B hide into background
Configuration
Linux: CentOS
/etc/sysconfig/network-scripts
ifcfg-eth0 # content of file see below:
DEVICE=eth0
HWADDR=08:00:27:1C:7C:F4
TYPE=Ethernet
UUID=22423422-32423-234234-234234234
ONBOOT=yes # Or “no” for ignoring this configuration
NM_CONTROLLED=yes
BOOTPROTO=no # Or choose the dhcp for auto ip assign
IPADDR=10.0.0.2 # in case working with dhcp option this and next string no need
NETMASK=255.255.255.0
GATEWAY=10.0.1.1
DNS1=10.0.1.1
Linux: Alpine
/etc/network/interfaces
auto lo
if lo inet loopback
auto eth0
iface eth0 inet dhcp
hostname alpine-vm
#or
iface eth0 inet static
address 10.0.1.120/24
gateway 10.0.1.1
dns 10.0.1.1
hostname alpine-vm
Other locations:
/etc/network/interfaces.d
Network Manager
nmtui # graphical
nmcli #command line
nm-connection editor
nmcli connection # c shows connections
nmcli device # d shows devices
nmcli connection show Wired\ connection\ 1 # show detailed description of the interface
nmcli connection down Wired\ connection\ 1 # shut down selected connection
nmcli connection edit Wired\ connection \ 1 # edit conncetcion in the nmcli
nmcli>set conncection.id My Statik Address
nmcli>set ipv4.method manual
nmcli>set ipv4.addresss 10.0.1.2/24
nmcli>print ipv4
nmcli>verify # check syntax before saving
nmcli>save
nmcli>quit
nmcli connection up Wired\ connection\ 1 #up selected connection
nmcli radio #shows status of wifi
nmcli radio wifi off
nmcli radio wifi on
nmcli connection edit con-name My\ Dynamic\ Address type ethernet
nmcli networking on
nmcli networking off
/etc/NetworkManager/NetworkManager.conf
For generating config files for NetworkManager or systemd-networkd
netplan
/etc/netplan
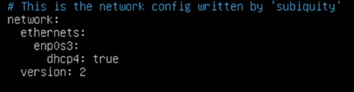
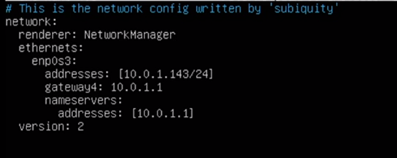
 network:
  ethernets:
    ens160:
            addresses: [192.168.1.150/24]
            gateway4: 192.168.1.1
            nameservers:
                    addresses: [8.8.8.8]

  version: 2
sudo netplan try
sudo netplan apply
cat /run/systemd/network/1-netplam-enp0s3.network # used
or
cat /etc/systemd/network/1-netplam-enp0s3.network # not used
networkctl
networkctl status
networkctl status enp0s3
Hostname
echo “New_name” > /etc/hostname
/etc/hosts # edit here to reflect hostname
hostnamectl # info about host
hostnamectl set-hostname NewName
firewall
ufw – Ubuntu
ufw allow ssh
ufw allow 22/tcp
ufw delete allow ssh
ufw delete allow 22/tcp
ufw status
less /etc/services
firewalld – RedHat, CentOS, Fedora
firewall-cmd –list-all
firewall-cmd –allow-service=ssh –permanent
firewall-cmd –allow-port=22/tcp –permanent
firewall-cmd –reload
firewall-cmd –remove-service=ssh –permanent
firewall-cmd –remove-port=22/tcp –permanent
Monitoring
netstat
ss
-t active tcp sokets
-u active udp sokets
-l active listening sockets
-p program responsible for that active socket